Declare independence from ice cream makers


If I was, for some odd reason, ever forced to choose just one indulgence food to enjoy for the rest of my life, it would be ice cream. Like, I wouldn’t even hesitate to commit to that as my chosen treat for the rest of my days. I loved it as a kid; I love it as an adult. I love it in warm weather. I love it in cold weather. I love it . . . well, you get the idea. There are any number of places to buy excellent ice cream, including the grocery store, and it’s exceedingly rare that my freezer at home wouldn’t have at least one kind of ice cream to offer. And while I absolutely don’t think the temperature outside has much to do with the consumption of ice cream, summer just screams for at least one batch of ice cream that I make myself.
Making a base for ice cream is a fairly simple process, one that I learned as a child. As a kid, my family often made homemade ice cream, especially on holidays like the Fourth of July, and I love to do the same with my own family. My dad, who was the ice-cream-maker-in-chief, loved fruity ice cream (banana and boysenberry topped his list of favorites), while I almost always chose something chocolatey. Even plain vanilla tasted extra special when it was made at home and scooped right out of the churn on a hot summer night. Soft, fresh and always pleasantly drippy, it was (and still is) a little piece of heaven.
I’ve used various methods over the years to make ice cream from scratch, all of which start in roughly the same way. A combination of cream, milk, sugar, flavoring and sometimes a few eggs is stirred into a custard and cooked over gentle heat. The process takes just a few minutes and even a beginner cook can do it. The next part is where it can get tricky. My parents had a bucket-style churn that required the use of ice and rock salt. It produced a fairly large container of ice cream but also made quite a watery mess, so we usually ran the ice cream maker outside where the runoff didn’t matter so much. On occasion, though, that rock salt somehow made its way inside the drum, and turned our delicious treat into an inedible mess. I think it goes without saying that salty ice cream is a tragedy of epic proportion.
As an adult, I have owned a few different versions of an ice cream maker that has a gel-filled base that can be repeatedly frozen, which eliminates the mess and calls for no use of salt. Alas, most versions of this type of ice cream maker produce just a pint or two at a time, which is simply inadequate for any kind of gathering among ice-cream loving friends. It also requires that the base sit in the freezer for 24 hours before use, taking up valuable real estate in my freezer.
The recipe I’m sharing here is even easier than the method I learned as a kid and completely omits the use of either kind of ice cream maker. I had my doubts that the taste and texture would meet my standards, but I’m happy to report that this treat is a winner on both counts, with a fresh, creamy flavor and an airy texture. It’s so quick and easy to make that I can envision making several batches quickly and flavoring them differently for an appealing variety of flavors. The ingredients are easy to find and simple to use. Whipping cream and sweetened condensed milk are whipped with a standard hand mixer, combined with flavorings and add-ins, then allowed to firm up in the freezer. That’s it. The whole process takes about 15 minutes (plus a few hours of freeze time). No churn, no mess, no skimpy portions, and infinite possibilities. The perfect treat to enjoy on a summer evening or really any day for the rest of your life.
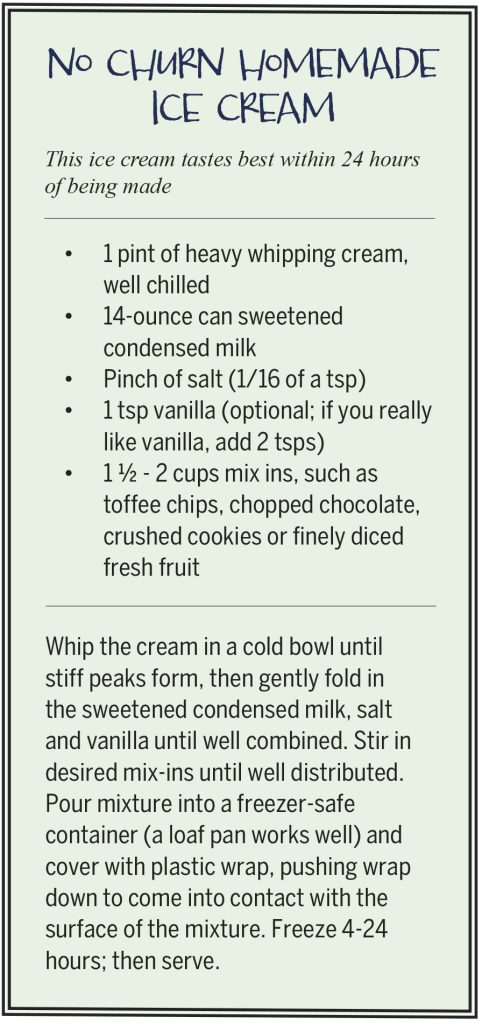
No Churn Homemade Ice Cream
This ice cream tastes best within 24 hours of being made
- 1 pint of heavy whipping cream, well chilled
- 14-ounce can sweetened condensed milk
- Pinch of salt (1/16 of a tsp)
- 1 tsp vanilla (optional; if you really like vanilla, add 2 tsps)
- 1 ½ – 2 cups mix ins, such as toffee chips, chopped chocolate, crushed cookies or finely diced fresh fruit
Whip the cream in a cold bowl until stiff peaks form, then gently fold in the sweetened condensed milk, salt and vanilla until well combined. Stir in desired mix-ins until well distributed. Pour mixture into a freezer-safe container (a loaf pan works well) and cover with plastic wrap, pushing wrap down to come into contact with the surface of the mixture. Freeze 4-24 hours; then serve.
Article and photo by Lisa Crockett